
Why air-assist is crucial for clean cutting edges
When you think of laser cutting, you quickly think of three buttons: power, speed, and focus. In practice, something else determines whether your edge is tight, clear, and reproducible: air-assist. That continuous airflow through the nozzle along the laser beam does more than just "a little blowing." It influences the thermal balance in the kerf, removes smoke, suppresses flame formation, and protects your optics.
What air-assist does in the cutting zone
During cutting, a narrow slot (the kerf) filled with hot gases and particles is created. Without airflow, those products remain in the laser beam, causing the beam to penetrate less deeply into the material, leading to faster discoloration/soot and even local ignition of the material. A well-directed airflow keeps the beam and remedies this.
Important to realize: air-assist must be adjusted, sometimes per material.The optimal air direction and pressure/flow differ per material and purpose (cutting vs. engraving). For example, a too strong jet can actually press smoke into the surface and give duller edges; too little air allows flame formation. The finesse lies in the tuning.
Material behavior: wood/MDF is "burning," acrylic is "melting"
Non-metallic materials roughly fall into two regimes:
Wood/MDF/cardboard: you cut through pyrolysis/oxidation. Extra oxygen from ambient air accelerates combustion; a strong air jet expels smoke, cools, and blows out fire spots. Higher pressure is advantageous here; the edge remains lighter and less burning occurs. You can also cut thicker material with higher air pressure.
Acrylic (PMMA/plexiglass): you cut by melting and gasifying, not by burning.You want to keep the melt briefly liquid so that the surface tension effectively "polishes" the edge (flame-polished effect). Too much air cools too hard: the edge becomes dull/milky. Therefore, a very low pressure is advised for acrylic, sometimes even off in specific setups (make sure to keep your optics clean!) or a maximum of ~0.2 bar with a larger nozzle.
This contrast explains why true "one size fits all" settings do not exist. Those who think per material (burning vs. melting) cut more consistently and cleanly.
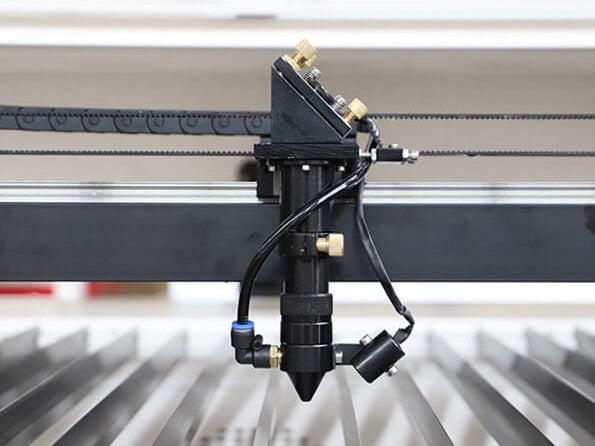
Nozzle and alignment: the air must flow through the kerf
Air-assist only works if the air flows straight with the laser beam close to the surface, into the kerf. If you blow from the side, you only help in one cutting direction and disturb the beam elsewhere. A nozzle distance of roughly 5–8 mm to the surface is often sufficient in practice, but this also depends on your focus distance.With acrylic, it pays to choose a larger nozzle diameter so that you can achieve sufficient discharge with lower pressure.
Compressor, air quality, and controllability
A diaphragm pump often suffices for engraving and light cutting work, but those cutting thicker material or larger series will notice the difference with a compressor: more consistent flow, higher peak pressures, and cuts less sensitive to variations in kerf contamination. Pay attention to air quality: oil and water are enemies of lenses and edges. Use a water separator/filters and regulator, and size hoses/couplings so that you achieve actual pressure at the nozzle.
Engraving: less is more
When engraving, you want to keep smoke away from the lens, but you don't want a turbulent jet that presses residue into the surface or scatters the exposure.Therefore, low pressure is commonly used in engraving for all materials.
Setting and fine-tuning in practice
Start from the material regime:
-Acrylic (clear/colors, GS/XT): start with very low pressure and only increase if you see flames or smoke lingers in the kerf. For smooth, glossy edges, we recommend ≤ 0.2 bar (~3 psi), preferably with a larger nozzle. If the edge becomes milky, lower the pressure or use a larger nozzle/lower speed so that enough heat remains in the cut for "flame-polish." Cut in one pass where possible; multipass accentuates the melt layers.
-Wood/MDF/birch plywood: start higher and watch for flames and edge color. Most practical experiences set MDF clearly higher than acrylic; think of an order of magnitude difference.Increase the pressure until the flames disappear and the edge becomes lighter.
Common mistakes (and how to recognize them)
-Too much air with acrylic: the edge is matte/milky instead of crystal clear → reduce pressure or choose a larger nozzle.
-Too high pressure when engraving: wipe marks around the engraving → reduce pressure or turn off air-assist during engraving. Always ensure your optics remain clean.
When is air-assist indispensable?
Always when vector-cutting organic materials (wood, cardboard, rubber) i.v.m. fire prevention, edge quality, and optics protection.
Usually when cutting acrylic, but very low to maintain the “flame-polish” effect. In some setups and thicknesses, “minimal or no air-assist” provides the clearest edge; test this purposefully.


